Thursday, December 26, 2019

The Middles’ Christmas Jackets


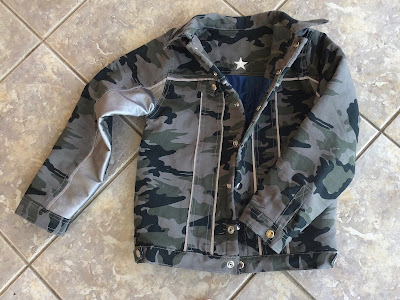
Thank goodness they both fit, with ease to get through winter time, since I'd promised to make a replacement if they didn't. Jet (left) endured scathing temperatures to wear his for some time so I take that as a hit. When I decided to make them these denim-style jackets, the rest presented itself. The boys have such distinct styles and personalities it was fun to explore with that.

Jet's jacket is made from cotton duck in his mode-of-the-moment, cammo. He's completely (utterly) car mad so I glammed it up (in a manly way) with reflector tape, cut and folded to make piping. Also, for my interests sake and why not, I added a grey soft vinyl panel in the arms. Both the leather-look and the reflector tape don't stand out, then flash in the light. Noice! Subtle.


Leif's is pin-whale cord, very soft and a bit stretchy so won't have that stiffness cord can have. He's a softie-lover-extraordinaire (and a softie himself) and so fur fabric was a must for the collar. I hunted far and wide. I might make a bag with the leftovers, 70's style (shh, no promises, don't tell him yet). The cord and fur made piping a no-go. Too much. So I blinged it out on the lining. I also added a zip instead of studs for the front opening, avaitor style. This entailed adding a placket like you would for a fly opening. No small amount of thinking to do that as it's been a while since I made dacks!


You can't see the linings absolute fabulousness here at all. It's like a tarnished silver (as in, has a gold cast) wild satin, bought from an African dressmaking and fabric shop in Footscray. When I saw it I immediately thought it must be mine and would be brilliant. It's mixed with the (almost) last of an orange satin I made my own children clothes with (Leif's aunty Ruby). The inside back yoke is brown velvet. There's a blue stripe in the sleeve and a sliver at the bottom of the left front too. That fabric came from a swap I did with some people in Powelltown, when Rob (Leif's Dad) was a baby.

Jet's jackets lining is from an old 80's dress I found at the op shop. It was one of those awful strapless numbers with rucching at the bust. Ew! Really, really the worst of the 80's (I know, there were a lot of contenders). Way to glam it up, understated style though. It's a quality taffeta.
Both linings are backed with cotton wadding so they are very soft and will be really warm and cosy. Confirmed by Jet without prompting.


How gorgeous are these boys! Cousins. It was nice to immerse myself into their personalities all the while I was making their jackets. I can cuddle them from afar.
Kids clothes are great to make. You can be really playful, although you can anyway, for grown-ups I guess. I loved making these and think I might try and imagine something for myself.

Sunday, November 10, 2019

New Bag From Old Canvas Work

Renegade Bag pattern by Sew Sweetness on Etsy.
Made using an old canvas work and one lining I bought at the Op Shop. Lined with an old silk dress (op shop again), over time. Zips, same.
It’s a good size and will fit milk and bread or my knitting, purse and shawl...
I’ve ordered D-rings and lobster clips and will make an over-body strap for it too. Then it’ll be perfect.
However, it’s still not the bag I need for everyday, so...

This is made without any pattern alterations.

I wasn’t fond of the image here, so cut it upside down.
 Fantastic old zip from the vaults. same with the yellow one below, which is gorgeous on the fleshy pink silk. Before you congratulate me on my thrift, I must confess that I’ve spent a lot on some heavy metal zips for the bags I want to make next.


Wednesday, October 23, 2019

Bobby's Fair Isle Tam o'Shanter Pattern

Just published the pattern on Ravelry and Etsy. Thanks Jen Next Door and Anna for modelling the tams for me! xxx


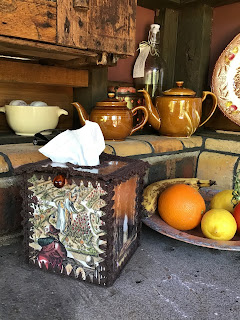
Garden Tissue-Box Cover for Garden Kitchen

Go here for the pattern and here for others.


The Garden Kitchen Has Arrived!


And now we will bar-b-que until we are as fat as pigs (unless we deflect current trending).

How beautiful is this! Clever boy. Xxxxx


Friday, September 27, 2019

Melbourne Show 2019w

We did it. The Melbourne Show for one day. It sounds simple, pack a case, go to show, demonstrate rug making...
There is always a lot of interest in rug making. We didn’t have our big proddy frames and it’s these proggy/clippy/peggy/proddy rugs that the children like to try. However Anne had a standing hoop frame for quilting so managed to let folk have a bit of a go... and lots of people watched or tried hooking too. Plus I got along with my Uzbekistan style rug #2.
It still surprises me that Rug Hooking is so little known in Australia, considering how it parallels quilting in the USA and always has.
But, we did meet Lee, who plans to come on Sunday, so slowly the group is expanding! And we have Veronica as well so that’s two more.

On the way in I bought a coffee at Belgrave’s Blacksmith Cafe and the lovely Alex was wearing this amazing cowl. Her grandfather had spun the wool and she had crocheted it herself. It is done in Crocodile stitch. It was so gorgeous and unusual I asked if I could photograph and post it. Thanks Alex.
I keep meaning to say that another old friend Jennifer Walton, who lives in Far North Queensland, is now a long distance member of our group. Jennie went crazy on tugging after a visit down to mine a little while back. I gave her Miriam’s excellent book and that’s the end of her!
Jen is onto her second rug, this time a hooked rug. She has a good eye as you will see. Pics to follow.
(Too lazy to come and bring a plate, obviously).

Tuesday, September 24, 2019

Saturday, September 21, 2019

Re Vamp of an Old Jumper

I’ve recently discovered ‘Fruity Knitting ‘ on You Tube and have learnt a great deal, including how to Edit or Alter garments that do not fit.
This is my first jumper. After having knitted a heap of face washers and deciding I could probably actually make a garment, I did this. Circa 2009.
It is Kate Davies’s Paper Dolls. I’ve knit it again and that one was too small! Note To Self: Recreate the colours of the second, too small version in another attempt.
So, with confidence borne of watching a few FN episodes where Andrea, the hostess (etc) cut and Kitchener Stitched back together a panel of a cardigan, I realised I could keep the doll section of the old, tatty Paper Dolls and a fair amount of the wool from the body (in order to have a similarly faded blue) and rework the entirety of the jumper, Top Down!

So, you slip your cable through a row of knitting, in this case I’ve started with a row just below the pattern, then snip a single stitch of the row under your cable. Then you painstakingly pull the loose end out, loop by loop.

I scribbled a bit of an idea at work yesterday, in my trusty notebook companion (which I must read to see what else I intended to do this weekend)...
I thought I should do a row or two of the blue, then could add a band of... even mohair? Or a blend with a different texture than the original? Perhaps in a shelly pink? Plus, rather than keep to the quiet blue and pink, I could add flashes of orange or sunset yellows to give it a new angle. We'll see.
Anyhow, it's fun to do this. I haven't the heart to throw it out and because it's a roundel, it doesn't suit cutting up for one of my Wagga's.
Wish me luck.

Sunday, September 08, 2019

Trish Johnson Is Coming To Town Sunday September 26th

Our next get together is on Sunday September 29th in Warrandyte, at Anne’s.
We are very excited to be meeting Trish Johnson who is visiting from Canada 🇨🇦 and will be joining us for our rug day this month. To that end, we are meeting on the Sunday, rather than Saturday as is usual.

Trish’s work is extensive and very interesting. I have picked up but a few images and it’s clear to see Trish’s extensive experience and skill! It’s going to be loads of fun.

So people, put on your glad rags, pack your show and tell and get over to Warrandyte on the 29th. If you need more information, email me at r.m.square@bigpond.com or text or phone 0410876096 (leave a message and I’ll call back... I’m Robyne).

I found a very good article at Rug Hooking Magazine’s website: https://www.rughookingmagazine.com/Celebration-Hall-of-Fame-Profiles/Trish-Johnson-Class-2018#section36228723

And go look see Trish’s own website:
http://trishjohnson.ca/


'Blossom'. Reposted From 2013

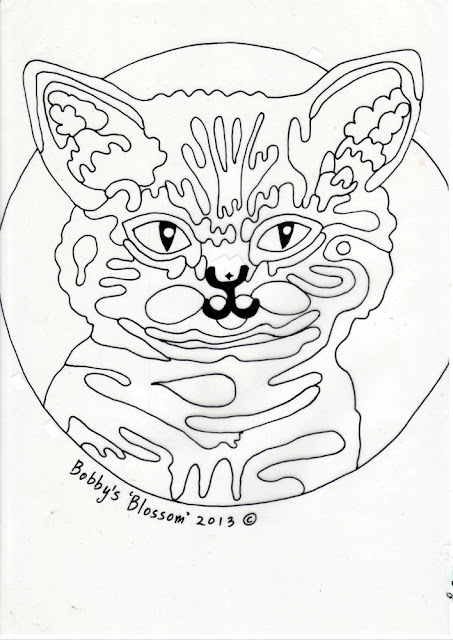
Here is the pattern for my Blossom Stool cover.

Blossom’
By Robyne Melia 2013 ©
This a sweet little hooky project for you, it’s just a kitten really and not a very difficult task I should think. I’ve not decided whether to make mine into a cushion, or add borders around and make a little floor rug? Hmmm

The first couple of cats I remember having (as a child) were named Blossom. These days I call my daughters and my little kitty grand-daughter ‘Blossy’. Maybe, as I think of it now, Mum didn’t give the cats’ a name at all, and they were known by the simple endearment of ‘Blossom’. Aw! Prrr.

The shading key is a little ambiguous I know, but if you look at some images of Tabby Cats, you’ll see what I mean. You can’t go wrong! I’ve used hand-dyed, checked, woollen blankets and some lovely hounds-tooth in the background. Scraps. You can use anything old clothes or wools (yarn) or T-shirting etc. My first Tabby Cat (not Blossy) was all pinks and reds with tartan kilt hems and stretchy cardigans.

For Your Blossom You Will Need:
·       At least 70cm / 28” square of Primitive Linen, Hessian or Monk’s Cloth.
·       The same of Non-Stretch white Tulle.
·       A Permanent Marker.
·   Scraps of fabric. The rule is that you’ll use 4 x the finished surface area for each colour. So, not too much! And with Tabby’s, you can ad-lib loads.
·       A Hook.
·       Some kind of Hooking frame, or a quilt frame or even a tapestry frame.
·       Scissors, a rotary-cutter, magic mat and ruler or a Strip Cutter.
·       A cup of tea and preferably a cup cake with pink icing.
                          
So, I have to admit right from the start that I forgot to put Black &White in my key! Just for the pupil and the highlight in the eyes. What was I thinking? I’ve run out of the blue I used for the eyes too, so it’s not in the picture (sorry), but you can figure that one out for yourselves, of course. I have faith in you.

Using the checked blankets for dyeing, I’m left with darker and lighter parts of each piece. Depending on how you cut your strips, you can vary the depth for any given area or let it fall where it will. In the ears        , I’ve used darker parts of the fabric.

My darling One True Love would say you (meaning myself) ought to print out a couple of spare patterns, and go at it with your coloured pencils or water-colour paints and I have no real reason to argue with that. Better still, give them to your little ones and see what they come up with!

OK...:

What you need to do now is:
·     Print out your Purrrfectly Free Pattern, then, get the outline drawing blown up from A4 to A3 size. This will bring it to the size of my own piece (30cm / 12inches across, plus ears), but you might like to make the cat image larger again. The very first thing to do after this is fix up where the circle doesn’t fit on the paper by measuring out from Blossom’s centre-point on her nose (all cats are called she in our house, cat’s mother or not). You’ll need to graft some extra paper onto the sides.
·       Now lay your Tulle over the pattern and pin or sticky-tape it to secure it. Then trace the pattern, with your permanent marker, onto the tulle (I put a layer of Cling Wrap in between so I don’t ruin my pattern original). Take your time.
·       Next step is to lay your tulle pattern over your Linen or Hessian or Monk’s Cloth, pin in place and carefully draw the lines onto the ground cloth. Clever huh? An oldie, but a goldie. Again, take your time.

·       You can zigzag the edges of the cloth at any point and it’s a good idea.
· Stretch your cloth taut, over your frame. This is the frame I use: http://www.ausrugcrafters.com/default.html. Other types are available as well (loads and loads of types). 
    Note: I just made this: https://judytaylor2013.wordpress.com/2015/08/31/how-to-make-your-own-spiffy-rug-hooking-frame/ only I made it taller. When I say I made it... I mean the One True made it. Obviously.

·       Now it’s time to cut some strips (around 1/4’ or 6mm wide). Again, I squeezed a Cutter out of a recent birthday, although it was a bit spendy! http://www.ebay.com/bhp/rug-hooking-cutter. A rotary cutter works just fine and so do good old scissors. Some people prefer scissors because the result is less uniform. My cutter is adjustable so I can vary it.

Here’s a little run through of rug-hooking:
Place one hand on the finished side and the other on the reverse side of the hessian, whilst holding the fabric strip on the reverse side (underside).
The hook is always worked from the top side. Push the point of the tool through the hessian (push it right in, so a good-sized hole is made by the thicker part of the shank) and pull a loop of fabric strip through. Repeat the process moving in the desired direction until either the end of the fabric strip is reached or the colour area is filled. The beginning and ending tags stay on the top of the fabric. When you start a new strip (everyone calls them worms), pull the ‘tag’ up in the same hole as the previous, so it’s not alone and lonely. So it sits snugly.
The loops should be close enough to sit comfortably side by side, touching but not crammed. But, just have a go and play is my advice. After an hour you’ll be hooking like a pro! (I'm obliged to crack that Dad joke, sorry).

Try watching: http://rugmaker.co.uk/hooky_rugs.htm or http://www.youtube.com/watch?v=JCVaRxyQ-jo. These are two of the best video tutorials online and make life so much easier.

(If you live in Victoria, Australia, then come to one or all of our get-togethers! We eat too much, talk just enough and share everything we’ve learned. It’s a lovely thing to do. You’ll find a place and add to the mix no matter where you’re at, whether you’ve not tried rug-making before or have years of experience. Just send a message via http://victorianrugmakers.blogspot.com and we’ll let you know where we’re meeting, or help in any way we can. Look at the blog while you’re there too.) Or (better because you will most certainly be noticed) email me at r.m.square@bigpond.com.

RightLet’s do this thing: 
1st of course, grab your tea and your cup-cake. Plump up a pillow for your back and I hope you have your slippers on or there’ll be trouble. Sometimes a sweetie-pie movie is nice, in the background, I find.

·       Start with the eyes. Work the background section around the eyes first, to secure your shape. Nextwell, I did the blue first and then the pupils, because otherwise, my pupils threatened to take over the world. The eyes are small and quick to do, so if it’s not working, pull it out and do it again. The eyes are the whole mood, so it’s best to be happy.

·       Note: You can have a little practice run (if you’re a little bit nervous as a first-timer) by filling in some of the bigger blocks of Tabby.
·       Next, put in the nose and mouth line.

·       Now you just have to play. My only advice is to complete one section at a time, or you’ll forget where you were up to, like I kept doing. Again, these Tabbies are very forgiving in their stripeyness, so don’t fret! Not even a little bit! Refer to your pictures and don’t forget to drink your tea before it goes cold.

I’m trying to decide whether to make Blossy into a cushion or keep adding around the circle to make a smallish rug, for my grand-daughter. Probably a cushion. So, that being decided (right this moment, yes, mid sentence), I’ll use a colour like the Hessian, since it looks quite nice. Then, Always, ALWAYS use velvet for the back. It’s a rule. A rule for snuggling.

          NOTE: If you have any difficulties, please email me. I need to know so I can make it clearer, and besides, I love the chit-chat. And send me a picture huh?

          Good luck Blossoms.

X Bobby aka Robyne

P.S. This design remains the copyright of Robyne Melia. It may not be used for commercial puposes, although finished Blossom’s may be sold for charity fundraisers with love. 


P.S. I ended up making a stool cover, with pom-poms around the underneath.
Also, on the side bar on our blog (http://victorianrugmakers.blogspot.com) you'll see 'Tutorials' and ''Rug Making Supplies'  links. Go see.

Saturday, September 07, 2019

Gembrook Quilt Fair & Rug Hooking Demonstration Extroirdinaire

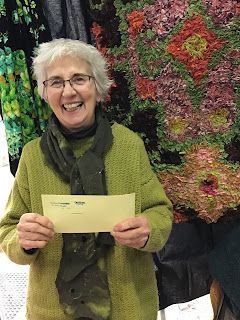
Anne and I (Robyne) braved the hail, wind, rain and freezing cold to get up to beautiful Gembrook for the CFA Quilt Fair. A mini stitches and craft type (indoor and cosy) event with loads of stalls and a raffle, in which Anne took 4th prize. She won a gift voucher with enough in it to purchase batting for a new quilt. We also were visited by old and very dear friends, whom we hope to snaffle for rug days and more chitter chatter.
Quite a few ladies were keen to begin rugging. It seems that people have had it earmarked for the future (which encroaching age makes you realise is now). This also was my story when I first met the gals.


The hall had three large canvas works with local themes. Also were what appeared to be children’s needleworks. Love the skate ramp seen in one of them!

A happy mess of fluff.

Go Anne!!
Our next get together is at Anne's on Sunday September 29th. The day after the grand final. Let us know if you want to come on 0410876096. Leave a message if I don't pick up!
Quite a few people picked up a copy of Miriam's brilliant book!


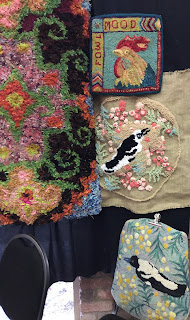
Katherine's and my magpies.